
How to Choose a Solar
Eclipse Viewing Location
A complete guide to choosing where to view a solar eclipse, particularly total eclipses. Includes techniques for virtual site scouting, site visualization, and final site selection. Written for photographers and visual watchers alike!
Last Updated: 30 March 2024
A Quick Disclaimer Before We Begin:
While I guarantee you that seeing a total solar eclipse will be one of the most amazing experiences of your life, it is not without the potential for serious risk to your vision. Please take extreme care in viewing and photographing the sun.
This is only a guide, not a substitute for common-sense. Even if it is 99.9% eclipsed, do not look directly at the sun without proper eye protection. Looking at the sun without eye protection is only safe during the brief period of totality.
Lastly, remember that viewing even a partially eclipsed sun through telephoto lenses and telescopes -even with appropriate solar filters- will dramatically increase your chances of permanent eye injury.
Let this experience be memorable for the right reasons!
Solar Eclipse Types in This Guide
This guide is intended primarily for total solar eclipses. Many of the topics discussed below apply to the viewing of annular solar eclipses (eclipses where the whole moon doesn’t totally obscure the sun, leaving a ring-like effect), hybrid solar eclipses (a single event which is either a total eclipse or annular eclipse depending on viewing location), and -to a lesser extent- partial solar eclipses. This guide is not intended for lunar eclipses.
When there is pertinent information concerning annular, hybrid, and partial solar eclipses, I will call out this information in a text box like this one.
Comments specific to the 2024 Great American Eclipse will be called out in red and italicized.
This tutorial is for educational purposes only. I have not been furnished to endorse any of the products herein, and I do not stand to gain financially in any way from this guide’s publication. As it is educational, materials on this page are introduced under fair use.
One last disclaimer: you will need a desktop or laptop PC or Mac to complete this tutorial, and it cannot be completed on a mobile device or tablet.
Introduction
My Background in Solar Eclipse Viewing and Photography
I have been fortunate enough to have seen and photographed many eclipses, including two total solar eclipses: the Great American Eclipse in 2017 and the Great South American Eclipse in 2019.
Do these experiences make me an expert on solar eclipses? Absolutely not!
But I still think there is a lot of valuable information I can impart to you.
I am admittedly not terribly far removed from my first total solar eclipse photography session. Resources, strategies, pitfalls, shortcomings, and lessons learned are still fresh in my mind.
Also, my experience is limited by the fact that total solar eclipses are rare and there haven’t been many opportunities to view or photograph them in the digital age. If you’ll forgive the pedantry, allow me to elaborate:
Since 1 January 2000, there have only been seventeen total solar eclipses.
Of these seventeen:
Three (2003, 2015, and 2021) occurred in remote Arctic or Antarctic areas,
Another occurred in late 2020 during the height of the Coronavirus pandemic, mostly limiting accessibility to those who happened to already be in Chile or Argentina, and,
Another two (2001 and 2013) occurred in generally inaccessible parts of Central Africa.
This leaves only twelve “accessible” total eclipses since the beginning of 2000, and -even then- you’d have to have been pretty well-heeled and dedicated to have seen them all.
But, let’s assume for a second you had an incredible amount of disposable income with an ice-breaking, ocean-going vessel and expedition teams on-call to help you access remote jungles, deserts, and tundras which allowed you to view all eighteen periods of totality for the longest durations possible.
The maximum amount of experience you would have viewing totality is 53 minutes and 24 seconds. That’s it.
Between June 1999 and present, there have only been 33 annular and partial eclipses in addition to the 12 total / hybrid solar eclipses worldwide.
I bring this up to highlight that there have been very few opportunities to plan the viewing of solar eclipses in the digital age. This is my method for making efficient use of all the information we now have at our disposal, and I hope you find it helpful!
What Makes This Guide Different From Others?
I am keenly aware that -unless the SEO gods are very, very kind- this is not the first webpage you have come across on total eclipse viewing or photography, or maybe even eclipse site selection.
So what, you may be asking, makes this tutorial different from others? In a word:
Planning
There are plenty of amazing websites on the internet which deep-dive specific aspects of total eclipse viewing and photography. Equipment, settings, and the weather are all talked about in great detail on other websites across the internet, many of which I will proudly highlight in this guide.
In my experience, guides for choosing eclipse viewing sites have been very hard to come by. Moreover, I have not found any tutorials which exploit our ability to virtually visualize eclipses to aid in site selection. This guide aims to show you how to do both.
As I mentioned above, totality is an incredibly short-lived event. In fact, if you’re reading this in advance of the 2024 North American Eclipse, you will have -at best- 4 minutes and 30 seconds of totality, and it’ll be another 20 years until you have the chance to see totality in North America again. The last thing you’d want is to be in a location with heavy cloud cover, in an area with viewing obstructions such as mountains and hills, or driving around helplessly and miss the big event.
My primary goal here is to make this process as understandable as possible. Can I promise you’ll get a crystal-clear view of totality? No, but I can give you all the tools necessary to give you the best chance to do so.
Who is This Guide For?
This is a guide for anyone asking, “Where can I see a total eclipse?”,“Where is the best place to see a total eclipse?”, or even “Where can I see the 2024 total eclipse?” This answer will be different for everyone based on their circumstances, but if you’re self-planning an eclipse viewing experience I’ll certainly help you find the best response for you.
If you are part of an organized tour which will bring you to a pre-planned eclipse viewing location and you want to see what it will look like, you may skip directly to Part Three: Eclipse Visualization.
Part One: Virtual Location Scouting
The absolute first step in viewing or photographing a total solar eclipse, is -of course- figuring out where to go to and see it. Self-planning can be a difficult process, but know that it gives you the greatest amount of flexibility and the highest chance of success on eclipse day. To me, it is worth the effort.
I’ve broken up the process of choosing where you’ll see the eclipse into three parts: virtual location scouting (to help you identify a region which works best for your needs), site visualization (where you’ll use tools to identify the best possible viewing locations within this region,) and final site selection (using information on eclipse day to commit to one specific location.)
Let’s start off our virtual location scouting section by talking about the number one factor in total eclipse viewing and photography - the weather.
Long-Range Cloud Forecasts
I suspect I won’t have to elaborate on why clouds are such a problem for viewing and photographing total eclipses.
Thankfully, there are plenty of great resources to help us try and defeat our puffy nemesis.
First, I want to introduce you to what I consider the best all-around geographic visualization tool for eclipses, timenaddate.com’s eclipse portal. On this page you will see a list of upcoming eclipses, although we are only interested in the solar eclipses.
Choose a page -like this one for the 8 April 2024 Great American Eclipse- and you can see the path of the solar eclipse and the maximum percentage of the sun eclipsed represented geographically, including -in this case- the area of totality.
The timeanddate page works similarly for annular, hybrid, and partial solar eclipses, showing you total sun coverage based on location and time, and as such is an equally valuable tool for these events.
Click around the map - you’ll find lots of information on the pop-up window such as:
Type of eclipse (total or partial, in this case),
Obscuration (how much of the sun is covered),
Magnitude (the fraction of the sun covered by the moon, always equal to or greater than 1.0 in the case of a total eclipse),
Duration (how long the eclipse will last) and duration of totality (how long totality will last),
Beginning and end times, and,
Cloud cover.
Concerning duration - click towards the edges of the zone of totality and you will notice that this number drops off quite quickly. It is best to consider viewing locations as close to the dotted center line of totality as possible.
There is also an option to search for a specific location, if you choose.
Clicking the blue play button will bring you to a page with additional details about the eclipse from your specific location. This will be important later so don’t forget it, but for now we’re just focusing on the pop-up window on the map.
Here’s a really brief video highlighting this page (notice the excellent mouse-over work by yours truly!!!)
Obscuration / magnitude, cloud cover, and duration of totality are the most important figures here and will guide every single decision we make moving forward. If you want to have the best chance of photographing a total solar eclipse you need 1) totality, of course, represented by an obscuration of 100% or a magnitude equal to or greater than 1.0, 2) the least amount of cloud cover possible, and 3) if possible, the longest duration of totality possible; i.e., a location closest to the center line of totality.
For the record it is unknown to me which source(s) timeanddate pulls from for its cloud coverage data. That said, having tested specific locations against well-known meteorological datasets of cloud cover, their figures appear to be more than sufficiently accurate for eclipse planning purposes.
I want to make abundantly clear the long-term cloud coverage estimates on this or, frankly, any other website is based on average observations over many years and does not necessarily reflect the cloud cover you will experience on eclipse day. Ultimately, the only cloud coverage reports that will truly matter are those made within a few days of the total eclipse itself. We will explore this concept further later in this guide.
I’d be remiss if I didn’t call out that the undisputed champion of eclipse-associated weather websites, Eclipsophile, has a -dare I say?- stellar cloud cover page for the 2024 event. In it, they talk about regionally-specific weather, but also really important sub-topics like severe thunderstorms and tornados. I highly encourage anyone to check this out in advance of this event.
The Three Types of Eclipse Regional Commitments
I whole-heartedly realize that it is impossible in most cases to wait for cloud cover weather reports within a week of an eclipse to make air travel, rental car, and / or hotel arrangements. But, I think given your specific circumstances and the long-term projections concerning average cloud cover we discussed above you should be able to commit to at least a geographic area where you can see totality. I call this a regional commitment. Remember this term, I use it quite a bit in this guide. There are generally three types of these regional commitments:
The “Best-Possible Viewing Conditions” commitment, in which you travel to the part of the eclipse path with the best balance between totality duration and average cloud cover,
The “Destination” commitment, where you decide to travel to a specific location for any number of reasons (convenience, safety, you know people who live there, you want to do sightseeing in conjunction with your eclipse trip, etc), and
The “Close-to-Home” commitment, where you resolve to see the eclipse within a specific distance of your home base (obviously only applies for those who live in the region of totality.)
There are reasons why you might pick or not pick any of these strategies. For example:
Some of the best possible viewing conditions for the 2024 eclipse, for example, are in the Mexican State of Sinaloa, so you may opt to fly down to Mazatlan and view the eclipse from the beach where there is about a 28% chance of cloud cover. Alternatively, you may not wish to travel to an area so deeply associated with cartel criminal activity and opt to go somewhere with lesser odds of a clear day to avoid this situation.
You may be forced to make a very specific destination commitment, as during the 2023 total solar eclipse, which was only viewable from land in extremely small areas of Australia, East Timor, and Indonesia.
You may, for example, live in the totality zone in northern Maine where cloud cover is estimated to be near 80% in April 2024; this will force you to either abandon your home base, or stay home and roll the dice on 5-to-1 odds.
I do want to point out that sometimes cloud cover is a complete non-factor, as is the case with most of the area of totality during the 2027 total eclipse.
At the end of the day, only you can decide which of these regional commitments is best for your needs and budget.
If you are stuck deciding between options for 2024 in particular, the timeanddate map and Eclipsophile page will certainly help steer you in a preferred direction. If you are truly stuck, feel free to reach out to me and I might be able to help point you in the right direction, or leave a comment below.
Virtual Location Scouting Recap
Okay, so we’ve reached the end of the first part of this guide, Virtual Location Scouting. You should:
Be able to view eclipse events on timeanddate.com and understand how to find eclipse-related information by clicking on the eclipse event map,
Understand the three most important factors in choosing an eclipse viewing location: obscuration / magnitude (“Can I see a total eclipse at this location?”), cloud (“On average, is this location clear or cloudy on the date of the eclipse?”), and duration (“How long will totality / annularity last at this location?”), and,
Understand the three types of “regional commitments” (Best-Possible Viewing Conditions, Destination, Close-to-Home) and how to select the best type based on your needs and cloud cover data.
If so, let’s move on to the Site Visualization section!
Part Two: Creating a List of Possible Viewing Locations
Imagine yourself on eclipse day: you wake up in your hotel room or your home and you have a list of possible eclipse viewing locations all ready to go. For each one you already know what the location looks like, when the eclipse will start and end, and where in the sky the sun will be during totality. You even know potential constraints such as obstructions and parking. But here’s the thing: you’ve never actually physically been to any of these sites.
If you’ve gone through the first section of this guide, Virtual Location Scouting, you will understand the need to select a regional commitment for your eclipse viewing site selection.
In this section, we are going to refine this regional commitment down to a handful of possible viewing locations. Then, we are going to build out a profile for each of these possible viewing locations so you have all the pertinent data ready-to-go before eclipse day.
This planning process works the same for other types of eclipses, and is particularly useful for planning annular eclipses which tend to emphasize the eclipse as part of a greater landscape photographic composition.
To begin, we need to be able to visualize possible eclipse viewing areas based on a singular starting point (like a hotel, or -if you are so lucky- your home.) To understand why this is important, let’s take some time to talk about the importance of flexibility.
A quick personal plea: there is nothing -and I mean nothing- in nature that compares to a total solar eclipse, and there is absolute no comparison between a 99% eclipsed sun and a totally eclipsed sun. If you have the means to do so, take the time and energy to seek out totality - I promise you that you will not regret the decision and you will remember those few minutes for the rest of your life!
Importance of Flexibility on Eclipse Day
Once you’ve selected a regional commitment based on your circumstances and cloud risk tolerance, the absolute most important factor moving forward is going to be flexibility on eclipse day. I’ve said it before: the only weather reports that are going to matter on eclipse day are the ones made within a few days of the eclipse itself. You may find that within 24 hours of the main event you need to make an adjustment to your preferred viewing destination. I will talk about my favorite near-term cloud cover forecast resource in a bit, but for now I am going to show you an excellent set of resources which will allow you to plan regional contingencies as they come up; more immediately, however, it may help you select a base of operations if you are traveling away from home.
Flexibility is going to be of the utmost importance during the 2024 Great American Eclipse. Springtime brings unpredictability and often sudden, serious thunderstorms throughout much of the area of totality. As I’ve mentioned, one of the best location for 2024 will be around Mazatlan, Mexico; the Mexican cities of Durango and Torreon are also quite favorable. Outside of Mexico, the area west of San Antonio and Austin, Texas, have the fewest average clouds. This figure steadily rises as the line of totality crosses the United States and Canada, peaking in the Canadian Maritimes. Frankly, any site north of around Fredericksburg, Texas, has a greater than 50% chance of cloud cover on eclipse day based on past observation.
Creating a List of Possible Eclipse Viewing Sites Based on a Central Point
(For better or worse, this part of the guide will require you to do some extra work. Don’t worry, it is nothing too difficult and I will gladly walk you through it.)
First things first, I want to introduce you to Smappen, a website which helps to visualize possible driving destinations from a specific point within a specified period of time up to three hours. Please go to the website and create an account - the free account is totally fine for our purposes (although if you happen to find the website useful for other ventures, like a business you have, consider subscribing - this thing is pretty cool!)
After registering, hit the “Go to the map” button at the top right. On the overlay that comes up, the most important button is going to be the “Add an area” button. Hit that and walk through the prompts.
Feel free to play around with the website a bit to get used to the controls - they are very intuitive and I don’t feel the need to elaborate much upon them.
Low-key one of the best features of Smappen is the ability to overlay a KML, which will plot the geographic data file of your choosing. For our instructional purposes now, we are going to overlay a publicly-available geographic data file of the area of totality for the 2024 eclipse.
This file is available on Xavier M. Jubier’s awesome collection of eclipse-related shape files. You can see he has an entire set of eclipse shape files from 1961 all the way to 2099 to choose from, but the one we are interested in for demo purposes is the one for 8 April 2024. Go ahead and download it. You’ll notice it is a KMZ (in other words, a Google Earth file) and not a KML, and since KMZs are not compatible with Smappen, we need to do a quick conversion.
Jubier’s website has collections of hybrid and annular eclipses, as well, and this process will work identically in these circumstances.
Navigate to this website, the MyGeodata Converter, and convert the KMZ to a KML. It is going to export this to a folder inside of which you will find the KML file we require for Smappen.
Head back to Smappen and drop-and-drag the KML file over the maps and -boom!- the path of totality is now overlaid. Go head an pick a city within the range of totality (Waco, Indianapolis, and Cleveland are good ones to experiment with), select a driving time range, and you will see which areas you can reach within a specified time fall within the range of totality.
You can also use this tool to determine which parts of the zone of totality you can reach within three hours if you wish to travel from your home on the day of the eclipse.
Now, a bit of a mental exercise. Think about the 2024 eclipse and consider which type of “regional commitment” you would make for this event. Go ahead and put in some cities within the region you’ve considered and see what your driving options may be.
Now compare these overlays to the cloud data on the timeanddate map - are there pockets nearby with lower likelihoods of cloud cover that you can reach if need be?
I think in an ideal world, we’d all stay in a hotel as close to the central line of totality as possible in a low-cloud region. For better or worse, the best place to view a total eclipse may be in an area with very low hotel density and you may be forced to stay on the periphery of the totality zone in a larger city where hotel rates will be significantly cheaper. For example, for the 2017 total eclipse I stayed in Rapid City, South Dakota, because the availability of hotels in the panhandle of Nebraska was incredibly limited and extremely expensive. For the 2024 eclipse, for example, consider stays in San Antonio, Austin, and Memphis for a decent comparison.
Obviously, staying in a hotel on the periphery will restrict the number of potential sites in your pool. Is this a sacrifice you are willing to make? Alternatively, is this a sacrifice you are being forced to make due to economic or hotel availability constraints? This overlay in Smappen will help you to visualize the consequences of this trade-off a little clearer.
Inevitably, what this all boils down to is you will have to make a choice which balances expense, convenience, and contingency. But there is another significant constrain we have no yet discussed: terrain.
Finding this guide helpful?
Consider a follow on Instagram.
Now back to the guide!
Eclipse Direction and Altitude
Remember back in the “Virtual Location Scouting” section I talked about the blue play button on the timeanddate website, and I said to remember that for later. Congratulations! Now is that time. Here’s the video again - you may skip to the 40-second mark:
Feel free to click around on the 8 April 2024 eclipse page on timeanddate page for a location within the zone of totality. Then, click the blue play button. You will be directed to a new page with lots of terrific data, but the information we are interested in is the direction and altitude at totality.
Depending on where you selected, you’re looking at a direction somewhere between southeast (135 degrees) and southwest (225 degrees), and an altitude between 24 and 69 degrees. To be more specific about altitude, if you picked a site in Mexico, the altitude will fall between 68 and 69 degrees; if you picked a site in the United States, the altitude will fall between 39 and 68 degrees; and, if you picked a location in Canada, the altitude will fall between 24 and 39 degrees.
Now go back to timeanddate and look at the data at the extremes of the event: “Partial eclipse begins” and “Partial eclipse ends”. If you want a beautiful series of photographs showing the entirety of the eclipse, like the one at the top of this page, your field of view is going to get a whole heck of a lot bigger.
It should go without saying that the significance of direction and altitude is that, in order to see totality, you’d need a southward facing site with no obstructions above the altitude at your location. But think about this a little bit more critically in the case of 2024: the further north you travel, the lower obstructions must be so they don’t affect viewing. Put in practical terms, the further north you travel, the larger open area you’ll need at your site because the sun is lower in the sky. It is also worth noting that the lower the altitude of the sun the more clouds are likely to affect your field of view, and -eventually- even atmospheric haze becomes a factor.
So remember the Smappen overlay you made in the last step? For better or worse, many if not most of the locations that you can access on that overlay will have some sort of obstruction which will disqualify them as a potential location. We’re going to explore this more in the next section, as it is the last step in creating a list of possible viewing points.
Generally speaking, the direction and altitude conditions for the 2024 Great American Eclipse are pretty favorable: there is a strong correlation between lesser cloud cover and higher viewing altitude. Also, the regions through which totality will pass are generally flat and -with a few exceptions here and there- rural.
Creating a List of Possible Viewing Points
So you understand my perspective fully, I view creating a list of potential viewing sites as a subtractive, rather than additive, process; that is, I believe you should begin with a very wide net (in this case, the entire path of totality for an eclipse), and disqualify regions until you are left with a manageable number of potential locations. If you’ve come this far, you’ve already done most of the hard work: you’ve selecting your regional commitment and you’ve created a driving range map based on the core of that regional commitment. Now we can chip away even further.
Terrain and Other Obstructions
The first of the remaining disqualifying factors I want to analyze is terrain. Terrain is actually pretty convenient for us to consider because -unlike clouds- terrain is static and unchanging.
On the flip side, terrain is pretty inconvenient for us to visualize along with our other data. For better or worse, there is no terrain layer in the free version of Smappen, so if you want to analyze the terrain for natural obstructions like mountains or hills, you’ll have to pull up a corresponding Google Maps page of the same area with the Terrain filter turned on. Perfect? No, but it should help you to broadly identify areas not suitable for viewing.
I will let you know this can be one of the most frustrating aspects of eclipse planning, and -if the terrain is very extreme in your region of commitment- it may even force you to go back to the drawing board and consider a new area.
I’ll give you one example of this from real-life where terrain was a major factor: planning the photographing of the 2019 Great South American Eclipse was an absolute nightmare because of the Andes Mountains. Not only are they a wonderful obstruction, but really tall mountains mean a near-constant wall of clouds on one side (in this case, the Pacific Ocean side.) The time of the day of this eclipse was a massive problem, as well, as totality occurred not long before sundown. This meant the sun was very low in the western sky … which just happened to be where the Andes were when you were standing in the so-called “rain shadow” dry zone to their east. Long story short: here is the timeanddate stats page for where I chose to shoot the eclipse. I thankfully was able to use the techniques I’m describing here to locate a hill overlooking a salt flat just far enough away from the mountains that they weren’t a factor (but only just.)
Now, I don’t want you to think that selecting sites is always difficult because there are quite a few features that you can look for that will probably be good locations for eclipse photography due to little-to-no obstructions. Here are some quick examples:
Large athletic fields without light poles,
Lakeshores and beachfronts,
Salt flats and playas,
Farm fields, and
Clear geographic prominences (like a treeless mountain summit or a mesa).
In addition to physical terrain, other obstructions -such as trees, buildings, power lines, and the aforementioned light poles- are ones you’ll want to look out for. This applies mostly to cities, but you’ll certainly want to factor this into your decision making calculus, as well.
Particularly for annular and partial eclipses, you may want to incorporate the terrain into a landscape photograph - you may use this method to scout out potential sites for this purpose, as well.
A good resource for this purpose is Google Earth Pro for Desktop, which allows you to view terrain features, as well as obstructions such as buildings in certain areas. It is not ideal, and I certainly wouldn’t rely on it because it does not have ground-level viewing.
To overcome this, I recommend -whenever possible- paring your Google Earth Pro view the Street View in Google Maps. This has a drawback, as well, because it only shows you a single snapshot in time and does not show you where the sun will be on any given day. Don’t fret: we will unlock the full potential of Street View in a coming section!
Accessibility
So you may have been able to neck down your regional commitment to a handful of potential areas. That’s fantastic. Now you’ll need to make a set of specific locations based on accessibility. There are two types of accessibility considerations:
Legal access, meaning, is the area you plan to view the eclipse from publicly-accessible, and
Logistical access, meaning, can you plausible access the site.
Overcoming legal access is generally an easy thing. Public parks and road right-of-ways are commonplace throughout the world. Furthermore, there is a feature in Smappen which can assist. On the right side of your map page, select “Points of interest” and create a new data layer; add "Parks” and “State Parks” to this search and hit “Save.” This will plot parks on the map. I will caution two things about doing this, because it is not perfect. First, the name of the park is paywall restricted, although you can cross-reference the name with another application like Google Maps or OpenStreetMap (or, you can pay the license fee, of course.) Second, the dot for the map appears to be the center point of the park itself, so if the park is of an odd shape, the center point may appear quite offset from the park’s access point. But it may help you put ideas in your head.
Logistical access is a little bit more difficult of a thing to overcome. In the case of parks or right-of-ways, parking may be a significant issue. Be sure to come up with a plan for where you will park your vehicle and consider that the park may not be scaled to handle an influx of people arriving to view an eclipse.
An example from the real world: I ultimately viewed the 2017 Great American Eclipse from Agate Fossil Beds National Monument in Nebraska. Over 11,000 visitors similarly chose to view the eclipse from this National Parks Site. By way of comparison, the site had under 16,000 visitors for the entire calendar year of 2016. The staff handled the logistics flawlessly, but I suspect at some point the staff had to begin turning vehicles away because of a lack of parking. Thankfully, I showed up early and I encourage you to show up a few hours before the event begins if you think parking will be a significant factor at your viewing location of choice.
Physical access may also be problematic for some. Suppose you want to view the eclipse from atop a mountain bald or a mesa, or from the middle of a salt flat or playa. Can you physically carry all of the equipment you will need the required distance?
Lastly, traffic is a thing you need to think about. During the 2017 Eclipse, it took about 30 minutes from when I arrived at the queue to enter Agate Fossil Beds National Monument until when my vehicle was parked. 30 minutes can make a huge difference! For the 2019 Great South American Eclipse, I arrived at my viewing location only a few minutes before the beginning of the partial eclipse (first contact) because of unexpected road construction in San Juan, Argentina. Leave yourself some wiggle room!
My best advice here is to make a list of ten potential sites spread out all across your regional commitment. The area you will be able to reach within three driving hours of your base of operations will be massive, and there will definitely be local weather variations on eclipse day from one end of this region to the other. Try and stick to sites as close to the center line of totality as possible, of course, but don’t be afraid to sacrifice a few seconds of totality for the sake of a better viewing location.
Once you’ve made a list, we can visualize what the eclipse is going to look like on eclipse day. We’ll do this in the next section.
Creating a List of Possible Viewing Locations Recap
We’ve reached the end of the second part of the guide, Creating a List of Possible Viewing Locations. You should now be able to:
Understand the need for flexibility on eclipse day,
Create a map in Smappen showing overlays of the eclipse area of totality as well as possible viewing areas based on driving distance from a central point,
Use timeanddate to find eclipse direction and attitude information for a specific potential viewing point, and,
Create a short-list of potential viewing points based on factors such as terrain obstructions and accessibility.
Congratulations! You’ve now selected a list of locations for viewing the total eclipse! Now you take these possible viewing locations and actually visualize what an eclipse will look like from that exact location on eclipse day! I will show you how to do that in the next section.
Part Three: Eclipse Visualization
A word of warning: this is a very technical section which requires a certain amount of computer aptitude. It also requires four pieces of software: Google Maps, a program called Street View Download 360 (a program which allows you to download Google Street View images), Stellarium (an astronomy viewer program), and Adobe Photoshop (or equivalent photo editing software). If you are not tech-savvy or lack photo editing software like Photoshop, this section may not be for you.
Please watch the following video by Kamil Pekala in its entirety as it will be the basis of what we will do next (and give it a like while you’re at it):
We are going to use a similar method to help us to be able to view the eclipse as if you are standing at one of your potential viewing points on the day of the eclipse. How awesome is that? To demonstrate the power of what this can do - this is a video of the 2017 Great South American Eclipse simulated in Stellarium from the exact vantage point I viewed it from:
You can see just how close to the horizon this total eclipse was and why it was super important I knew 100% in advance that I was going to be able to see it. This, if nothing else, underpins the importance of this guide.
If you’re curious as to how accurate this tool can be, here is a photograph I took of the horizon at sunset which matches up perfectly with Stellarium.

You’ll see below I’ve created a step-by-step guide to help you navigate this process. Before we get into that, though, there are a few things I need to point out as there are some things I need to add to, modify, or clarify from Pekala’s video:
As you saw in Pekala’s video, you will be toggling back-and-forth between multiple windows until you get a finalized view in Stellarium. Do not close any windows, tabs, or programs until the process is complete as you will be going back-and-forth between them. Also it may be helpful to have Notepad / TextEdit open so you can keep information like coordinates readily accessible.
Coordinate and altitude information is used extensively throughout this tutorial and it must absolutely match the coordinates of the Street View you downloaded with Street View Download 360.
While Pekala searched the altitude of the mountain in his video, I recommend instead you use this elevation finder to convert coordinates to altitude. Remember ‘Muricans: Stellarium use meters.
The Wikipedia page he referenced for the rotation equation no longer exists, but here is the formula:

You absolutely, 100% must leave in the code “type = spherical”for this to work. Pekala deletes this in his video; perhaps worked in older Stellarium versions without it, but do not delete this block from the .ini file as it will not work in the current version without it.
Similarly, Pekala includes a time zone block; time zones don’t work in Stellarium as they once did, so this block is totally redundant.
Lastly, when you finally get around to importing your landscape into Stellarium, make sure you are viewing it during the “daytime” or your landscape will look disappointingly dark!
If you’re feeling overwhelmed, don’t be - I promise this process is a lot easier than it looks or sounds. Now, let’s get on with it!
The Visualization Method, Step-By-Step
For this guide, please feel free to choose your own scene to work with to start or follow along with the example I am demonstrating, which is the Rainbow International Bridge overlooking Niagara Falls during the April 2024 Total Eclipse.
Determine the Site You Want to Image: If you’ve gone through the first parts of this tutorial, you should have a list of potential viewing locations; alternatively, you may have already had one in mind you wanted to visualize before you clicked on this page. Either way, just make a mental note of it. For the tutorial, we will be using Rainbow International Bridge, as I mentioned.
Choose a Google Street View Image Corresponding to the Site: This should be fairly straightforward: search or pan-and-zoom for your location in Google Maps, grab the little orange figure in the bottom right corner, and choose a blue circle photosphere near to where you wish to visualize. If multiple photospheres are available, try and choose one with a) few clouds, 2) few obstructions like people or cars, and 3) is well-stitched, meaning there aren’t any obvious breaks from when the photograph was made circular. If the photosphere isn’t exactly where you plan on being on eclipse day, make a mental note of the new location as you will need to find it on timeanddate in the next step. Copy the URL of the photosphere and place it in Notepad / TextEdit. Here is the Rainbow International Bridge View we will be using for our tutorial.
Pull Up the Location’s Data Page on timeanddate: Open a new web browser tab and go to the timeanddate eclipse page associated with the event you are looking for (you can Google Search 2024 eclipse timeanddate, 2026 eclipse timeanddate, etc., to help find these). On the page that comes up, you should see the link “Detailed eclipse path map” - click it and pan-and-zoom to the location you identified in step one and for which you have identified a photosphere in step two. Click the area on the map, double-check it says totality will be 100% if a total eclipse, then click the blue play button to bring up the corresponding data page. Here is the data page for Rainbow International Bridge for the April 2024 eclipse. If you’re curious why we don’t do this first, a photosphere may not be available for the exact location you had in mind.
Download the Google Street View 360 Image: Open a new tab in your web browser (you should have three now) and go to the Street View Download 360 page. Download the appropriate version of the product for your operating system and install it. Open the application once installed. It should look like this:

Next, take the Google Street View URL from your first browser tab and copy-and-paste it into the “Panorama ID or URL” field. Choose a file path where to save the file, ensure single panorama is clicked, resolution is set to maximum, and hit “Download Panorama”. Do not close the program once completed - you will need metadata from this program again shortly, so just minimize it for now! If you’re completing the tutorial, your page should look like this:

Removing Sky from Photo in Photoshop: If you have Adobe Photoshop, please open the exported file (name defaults to Street View 360.jpg) in Photoshop. Here, you will remove the sky from the photograph. The easiest way to do this is to click Layer -> Sky -> Add a Layer Mask -> Invert. If you don’t know exactly how to do this, here’s a very terrible video:
You can then hit File -> Export -> Quick Export as PNG. You’ll notice this method differs from Pekala’s video - I think it is significantly more accurate and actually a bit faster. If you don’t have Photoshop, don’t worry: you can use a basic photo editor (like Microsoft Paint) and use a white brush to “white out” the sky, and it should work about the same, albeit a bit slower. You can also use a freeware tool like Gimp to remove the sky; while likely faster than the white paintbrush method, it is still going to be slower going than Photoshop, unfortunately.
Create New Stellarium Landscape Folder: First things first - if you don’t have Stellarium, go ahead and download it now. After it is installed, access the “landscapes” folder using either of these methods:
For Mac: Go -> Applications -> Stellarium (right-click) -> Show Package Contents -> Contents -> Resources -> Landscapes
For PC: Usually, this folder is located in C:\Program Files\Stellarium\Landscapes
As in Pekala’s tutorial, you are going to duplicate one of the folders (grossmugl works fine), rename it to a project name (rainbow, for Rainbow International Bridge, for our example), delete everything in the folder except landscape.ini, then copy-and-paste your exported PNG file into that folder. I also find it convenient to rename the PNG to match the folder name (rainbow.png, for example).
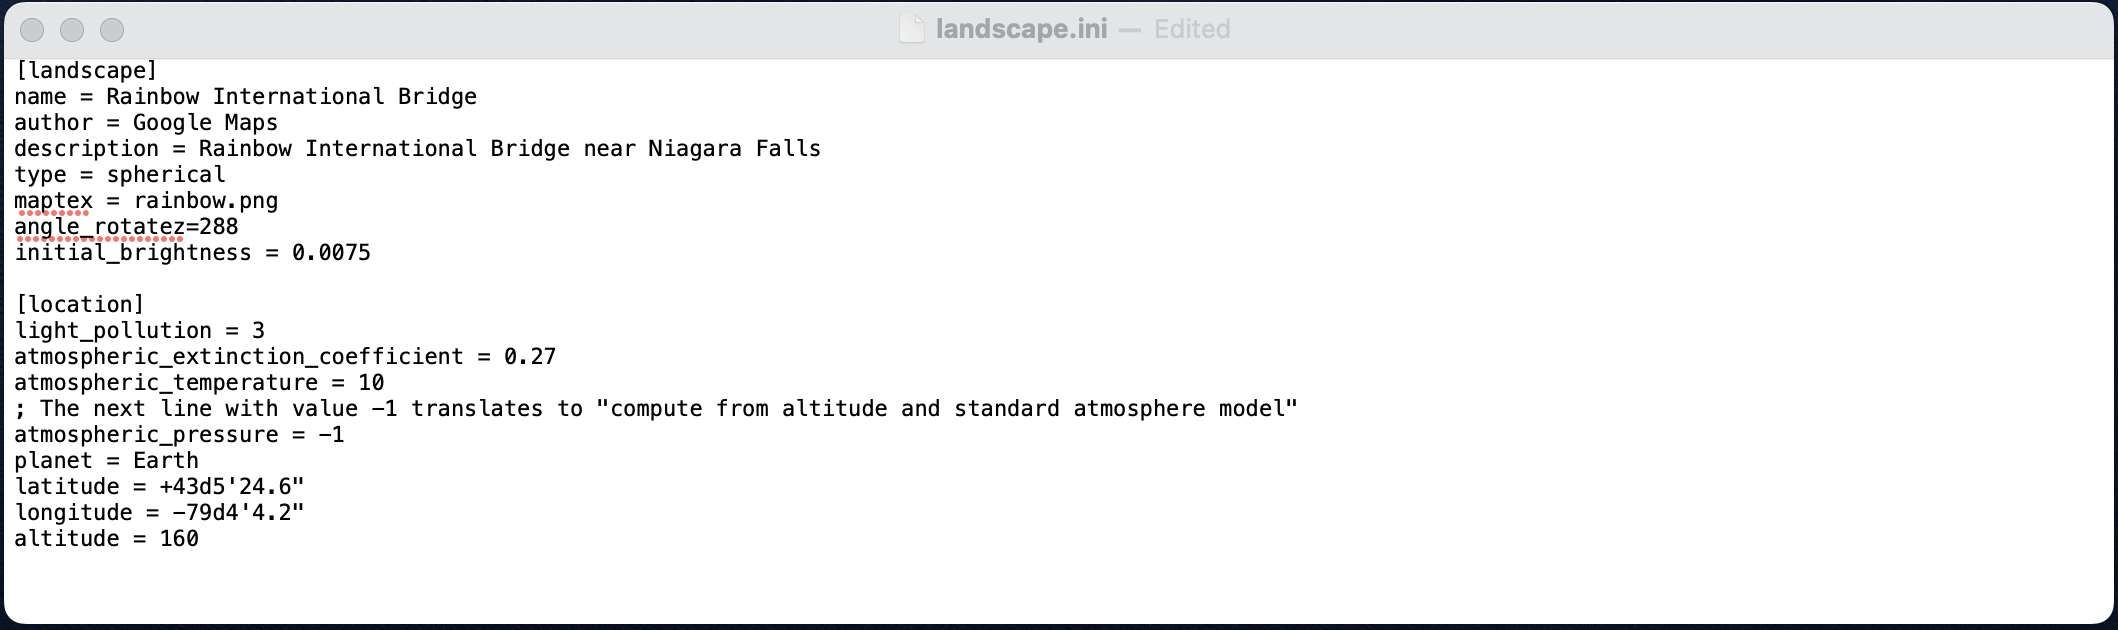
Modify landscape.ini File: Next, right-click the landscape.ini file and open with TextEdit (Mac) or Notepad (PC). You are going to delete all the lines of code except these (remember to leave “type = spherical” unlike the tutorial video):

We can change “name” to whatever we like (Rainbow International Bridge), “author” to Google Maps, “description” to a short summary of the image (Rainbow International Bridge near Niagara Falls), ”type” left as spherical, “maptex” to the 360 file name (rainbow.png in our case), and then save. We will change the remaining fields which need changing one at a time.
Latitude and Longitude: We need to grab our latitude and longitude of our scene from the Street View Download 360 program and convert it from Decimal Degrees to Degrees Minutes and Seconds using this website in a new browser tab. In the case of our Rainbow International Bridge photograph, you can see from the image above the coordinates listed on Google Maps were: 43.090160, -79.067842. This translates to 43° 5' 24.5754", -79° 4' 4.2306". We can replace the existing latitude and longitude data in the .ini file with this information. You can round to the nearest tenth, and remember to change “+” to “-” as applicable.
Elevation: Open a new browser tab and navigate to this website. Below the map you’ll see a “Find a location” bar - enter the coordinates you copied from Street View Download 360 into this field and search. This tool isn’t perfect, so cross-check it with this similar website. Remember to use meters in Stellarium! Now, for Rainbow International Bridge, we have to add the height of the bridge over the river, so let’s just call it 160 meters.
Angle_Rotatez: I’m not going to lie, Pekala describes how to calculate this angle better than I possibly can, so click on this time-stamped video to head straight to that part. Just know: precision in this step is incredibly important, so take your time and be as accurate as possible!
A reminder that the formula is as follows:
The website he uses to determine the direction between the viewing location and the selected object, for quick reference, is here.
In the case of the Rainbow International Bridge scene, I measured against the southwesternmost / leftmost point of the long building on the Canadian Side of Horseshoe Falls:

If you are uncertain which landmark this refers to on the image:

It is really, really, really important when you are going through this process to pick a landmark which is distinct and clear in both the 360 image import and on the distance and angle website.
I measured the location of this point in Photoshop as 4860 pixels on the x-axis (by the way, just use the x/y position tool in the Histogram, it is way easier than what is done in the video; just make sure the x/y is set to pixels). The total canvas size is 8704 pixels, so working through the formula we get:
270 + 219 - ( 360 * 4860 / 8704) = 288 (I recommend putting the formula straight into a calculator because the order of operations here is messy).
A quick note: if you are using a more basic photo editing program like Microsoft Paint, use that program’s integrated x / y coordinate system and the file’s overall pixel width, which can often be found in the file’s properties.
And, with that, our final .ini file should look like this for the Rainbow International Bridge tutorial (leave the remaining fields as is):
Loading Scene Into Stellarium: Go ahead and save the .ini file, then open Stellarium. If this is your first time using Stellarium, I highly encourage you to watch a tutorial or two on Youtube before continuing. Once it finishes loading, look for the “Sky and viewing options window” on the left side, and navigate to “Landscape”. You should see your custom landscape in the list - click on it, turn the minimum brightness up to 1 (so you can see the background easier), and close the window. You should see your imported 360 image in Stellarium! Close the window and pan around. I take this opportunity to check landmarks to make sure the directions are correct (meaning we calculated angle_rotatez properly). In the case of the Rainbow International Bridge import, “S” (South) appears just to the left of the Niagara Falls Observation Tower as expected. You’re going to notice the sky mask you built in Photoshop isn’t perfect - there’s not really much point in perfecting it unless you really want to.
Visualizing The Eclipse: The big moment has come! We can now use the “Location window” and “Date / time window”. For location, just enter your degree minute second coordinates and altitude in meters information from the previous step (this is why I recommend keeping them in Notepad / TextEdit), give the location a name, make sure the country is right (Stellarium has issues with this), and “Add to list” if you want to reference it later. For the “Date / time window”, simply enter the date and time of the event you are viewing. It is extremely important to note the time may not line up as anticipated - Stellarium uses the clock of the device you are accessing to determine the program’s time zone rather than use the time zone of the location being imaged so you have to add or subtract hours manually based on what time your machine is using and where your viewing location is.
If you have completed the tutorial, your final visualization should look like this:

Seriously, how cool is that?
There’s one additional feature I’d like to note quickly for photographers interested in incorporating landscapes into eclipse photographs: Stellarium has an “Azimuthal grid” feature which may be toggled using the bottom menu. This will allow you to know how high the sun will be in the sky so you can determine which wide-angle lens in your kit is most appropriate for the circumstances (you can reference this chart here). Using the previous example, the sun is just above 40-degrees at totality. This should tell you your stock 24-70mm full-frame lens should get Niagara Falls and the eclipse in the same frame, but may be a little tight. If eclipses are good at anything, it is making photographers buy all sorts of new equipment!

Another great thing about Stellarium is that you can actually add custom sensor and lens profiles based on the cameras and lenses you own. This will allow you to precisely visualize what your shot will look like from your viewing location. How to add lens profiles is way, way beyond this tutorial (here’s a how-to guide), but all the same just know you can go to the extreme in your pursuit of the perfect shot if you want. Here’s the same view, again, but this time with a rectangle indicating the viewing area of a 24mm lens on a full-frame camera, like we talked about just a moment ago:

This process works amazingly for Annular eclipses, as well - here’s what the moai at Anu Nau Nau on Rapa Nui will look like during the peak of the 2 October 2024 Annular Eclipse:

If you want to incorporate an eclipse as an element in a landscape shot, this Stellarium visualization tool is incredibly powerful if and only if the information you enter is correct and as precise as possible.
You can make a simulated view for each of your potential viewing sites. Once imported, make sure to change the time and date to match that of the eclipse event you are going to view, as well as the location latitude, longitude, and altitude information from where you will be viewing the eclipse.
Please don’t hesitate to reach out if you are having difficulty with any of this process, I will do my absolute best to help you remotely. You can also use the common feature at the bottom of the page.
I recommend making a simulation for each of your potential viewing sites. Is it time-consuming? Yes, but I think the effort is worth it.
For absolutely no reason, here is a screen capture of an identical setup I did for the July 2028 total eclipse which will be visible in downtown Sydney:

So now you can make an educated guess that if you want a view of the Sydney Opera House with the total solar eclipse behind it, you’d better start camping out for it now!
Eclipse Visualization Recap
We’ve reached the end of the third part of the guide, Site Visualization. You should now be able to:
Locate and download a Google Street View 360 image for a potential eclipse viewing location,
Use a photo editor and some light coding to import the 360 degree scene into the application Stellarium, and
Visualize an eclipse in Stellarium as if you are standing in a specific location as it is happening.
Good job! You’ve successfully visualized an eclipse from an exact location on a specific date. The only thing left to do is to know how to put all this planning to good use on eclipse day. We will talk about how to do that in our next section.
Part Four: Final Site Selection on Eclipse Day
It’s almost eclipse day. You have a list of pre-scouted potential viewing locations ready-to-go. You know you have one final task to commit to - picking your final viewing location. From here on out, only one thing truly matters: clouds.
Short-Term Cloud Forecasts
In the previous parts of this guide, we’ve tried our best to pick a region that is traditionally cloud-free for eclipse day. Nothing is assured, however, and we have to stay flexible. Cloud forecasts are generally reliable in my experience within 72-hours, so about three days before the eclipse I’d start to monitor cloud forecasts, and continue to do so right until it is time for you to hop in a vehicle and get to where you’re viewing it.
In my experience, the best all-around tool for showing cloud coverage forecast is the one offered by weather.us (don’t let the name fool you, it works worldwide!) There is one exceptionally important thing to remember about using this website, which I will highlight up front for emphasis:
The brighter the yellow, the fewer the clouds.
If you are an astrophotographer like me, dark portions of a weather map probably makes you think clear skies. This is not the case with weather.us, and hopefully you don’t get confused by this nearly as often as I do.
Click the link and draw your attention to the options on the left.
The two most important options are the “Change map selection” and “Change date” options. The “Change map selection” option should be pretty intuitive, and the “Change date” option is, as well, once you realize hovering over the “Forecast hour” will give you a date-time equivalent that you can actually understand.
As you’ve probably guessed, picking the window closest to totality is going to be the most important thing you’ll do on this website. For the default model, predictions can be made up to ten days in advance.
While cloud coverage is certainly something to think about for partial solar eclipses, these events last significantly longer than total, hybrid, and annular eclipse totality / annularity.
If you click different model types on the bar at the top of the map, you’ll see different models have different resolutions and different maximum timeframes (with GFS being the longest model I’ve seen with a sixteen day prediction window). I certainly recommend you toggle between these as you get closer to eclipse day to look for commonality and variations between different models.
Picking Your Viewing Location on Eclipse Day
Here is where all of your hard work is going to pay off. You can now take your list of prospective eclipse viewing sites and compare them to the near-term cloud forecast.
Go to the weather.us cloud site for your region about 12 to 24 hours in advance of the event and view all of the cloud models available to you. If there is a bright yellow patch on all the models for the time of totality, cross-check to see if any of your pre-scouted locations fall within that range. If any of them do, you likely have your best viewing location. Make sure to have some backup locations.
Undergo the same process when you wake up on eclipse day. This will probably be your last chance to view the cloud prediction model before you have to commit to one. When you do, be sure to make a list of plausible alternatives in case the situation changes.
Remember: the cloud forecasts for the many of the models are updated hourly. I highly encourage you, if possible, to check the cloud forecast en route. I’ll leave you with one more vignette: in 2017, my intent was to view the eclipse from Carhenge, the Stonehenge clone made of stacked vintage automobiles. About halfway to the site, the clouds shifted further east than anticipated, and -instead- I ended up at Agate Fossil Beds National Monument. Those at Carhenge were still able to see totality, so no harm, no foul. But their view was definitely much cloudier than mine was even just an hour to the northwest.
The Worst-Case Scenario: Bad Weather on Eclipse Day
If you wake up on eclipse day and absolutely no locations within your driving radius have good viewing, just know you’ve done everything within your power to make the best possible decision. That said, just because a computer model said there may be clouds doesn’t mean the exact section of the sky where the sun is located during totality will be obscured during a few random minutes. Get out and enjoy the experience regardless, and you may still get very lucky!
Just remember: you don’t control the weather.
The next two total solar eclipses -the 2024 Great American Eclipse and the 2026 Iceland / Spain Eclipse- are going to be at the mercy of unpredictable weather. In these cases, the vast majority of viewers are going to have to make same-day decisions about where to go. For these events, in particular, it is imperative to make a game-day plan with as many contingencies as feasible.
Some Other Tips You May Find Useful
Here is a list of tips I’ve compiled based on my experiences traveling to eclipse viewing locations:
Have your equipment ready-to-go a day or two in advance: Be sure to double-check that you have everything you need, especially filters. Don’t forget non-camera equipment, either, like coolers, chairs, folding tables, and power supplies. Oh, and certainly don’t forget your eclipse glasses!
Make sure you have a full tank of gas in your car: As I mentioned when discussing my 2017 eclipse trip in Nebraska, many regions which fall in the zone of totality are not used to supporting the influx of visitors that come with these events. This includes gas stations, which may face either fuel shortages or incredibly long lines.
Have all possible destination locations pre-saved into your phone: Obviously, how you will do this will vary by phone / operating system / mapping program, but I recommend you not waste valuable time having to enter this information manually.
Check directions to your preferred travel destination as early as possible: As great as Smappen is, it does not account for real-time traffic. Checking early and often will ensure you’re not stuck in traffic when the big moment comes.
Depart your residence or hotel once you’ve committed to a location: You’ll never know what complications may await you on your journey to your viewing site. Like I mentioned, in 2019 I encountered unexpected road construction outside of San Juan, Argentina, which meant I arrived just in time for the beginning of the partial eclipse phase. Leave as soon as you’ve committed, even if you think you’ll arrive a few hours early. Who knows: you may arrive at the site and the parking lot is full and you have to make a change on the fly. Don’t leave anything to chance.
Make a plan for, uh, numbers one and two: Between the potentially long drive time and the duration of an eclipse from start to finish, there’s a good chance this will happen. I recommend these.
Plan ahead for food and drink: Restaurant services may be limited where you are headed, so don’t forget to bring snacks, drinks, or whatever else you may need to get through the day.
Bring an accurate clock: You know -or, at least know how to find- the exact moment totality begins and ends at the site you’re viewing from. Having an accurate clock will not only allow you know when it is safe to remove your eclipse glasses (and know when to put them on), but it also lets you know the exact moment you’ll be able to photograph the famed Baily’s beads. (Please, please, please do not use the viewfinder on your DSLR or the eyepiece on your telescope to look at Baily’s beads - instead, use your camera’s screen.) If you are a photographer and are using one camera lens, this will also let you know when to remove your solar filter for totality. Speaking of which….
Use two cameras: I will provide a list of “how-to” guides for eclipse photography below, but my personal opinion is that the last thing you want to do when a partial eclipse transitions to a total eclipse (when cool things like corona and Baily’s beads happen) is have to take precious moments to remove a solar filter. So I highly recommend, if at all possible, use two cameras and lenses / telescopes.
If you’re a photographer, don’t forget to look: I know as a photographer we always want to capture the whole event. In this case, don’t forget to take a minute and just look up, especially during totality.
Final Site Selection Recap
We’ve reached the end of the fourth part of the guide, Final Site Selection on Eclipse Day. You should now be able to:
Use weather.us to determine the best viewing site,
Know how to pick your best viewing location on eclipse day, and
Prepare yourself for the possibility that it may be cloudy on eclipse day.
Well done! You’ve committed to a viewing location and you’re ready to see one of the most amazing spectacles of nature. I hope you’re able to and enjoy it as much as I do - I’d love nothing more than someone who has read this tutorial become an umbraphile!
Appendix I: Eclipse Photography Guides
When I first started writing this guide, I had intended to include sections on eclipse photography, including equipment, testing, and settings. Turns out there are already tremendous websites that so thoroughly cover this subject, there isn’t anything I could hope to add to them. I’ve compiled a few here - please check them out if you are interested in taking photos of the eclipse, especially totality. If you have any questions about any of the material covered on these websites, reach out to me in the comments below, and I’ll do my best to clarify.
Appendix II: References of This Guide
Here is a list of all the resources I reference in this guide: